Workshop Steps
- 0 - Installing Node.js
- 1 - Project setup
- 2 - Install Express
- 3 - Create Server
- 4 - Static Assets
- 5 - Creating Routes
- 6 - Templates
- 7 - Partials
- 8 - Adding the Recipe Page
- 9 - Adding a Database
- 10 - Adding the Recipe Page
- 11 - Adding Admin features
- 12 - Editing a Recipe
- 13 - Working with Markdown
- 14 - Adding a new recipe
- 15 - Delete Recipes
- 16 - And now what?
Useful Links
Step 6 - Templates
Ok, we’ve looked at routes and static assets, which leaves us one more key feature to discuss: templates.
Templates allow us to take a webpage and put placeholders in it for content that will be filled in by the server. This lets us create one template and use it for multiple pages. It’s really powerful. Templating is very common in web apps, but also often used for other purposes too.
There are many many different template systems and Express doesn’t have a built in one. Instead it lets you add one using a view engine. There are view engines for many different template systems but the one which we are going to use today is called EJS (or Embedded Javascript).
In this step, we are going to install EJS as a view engine for Express and change our TinyCakes home and about pages from static pages to templates.
Setting up Express to use EJS
First you need to install EJS, which you do with NPM just like you installed Express. Stop your server running and type the following in the terminal and press enter:
npm install ejs --save
Now that EJS is installed, we need to tell express to use EJS as the view engine. To do that add the following code before your routes:
server.set('view engine', 'ejs');
Express’s set() function sets configuration in the server object. Here we use it to set the view engine setting to ejs. Now when the server starts it will look for a package called ejs and try to use it as a view engine.
Adding a template
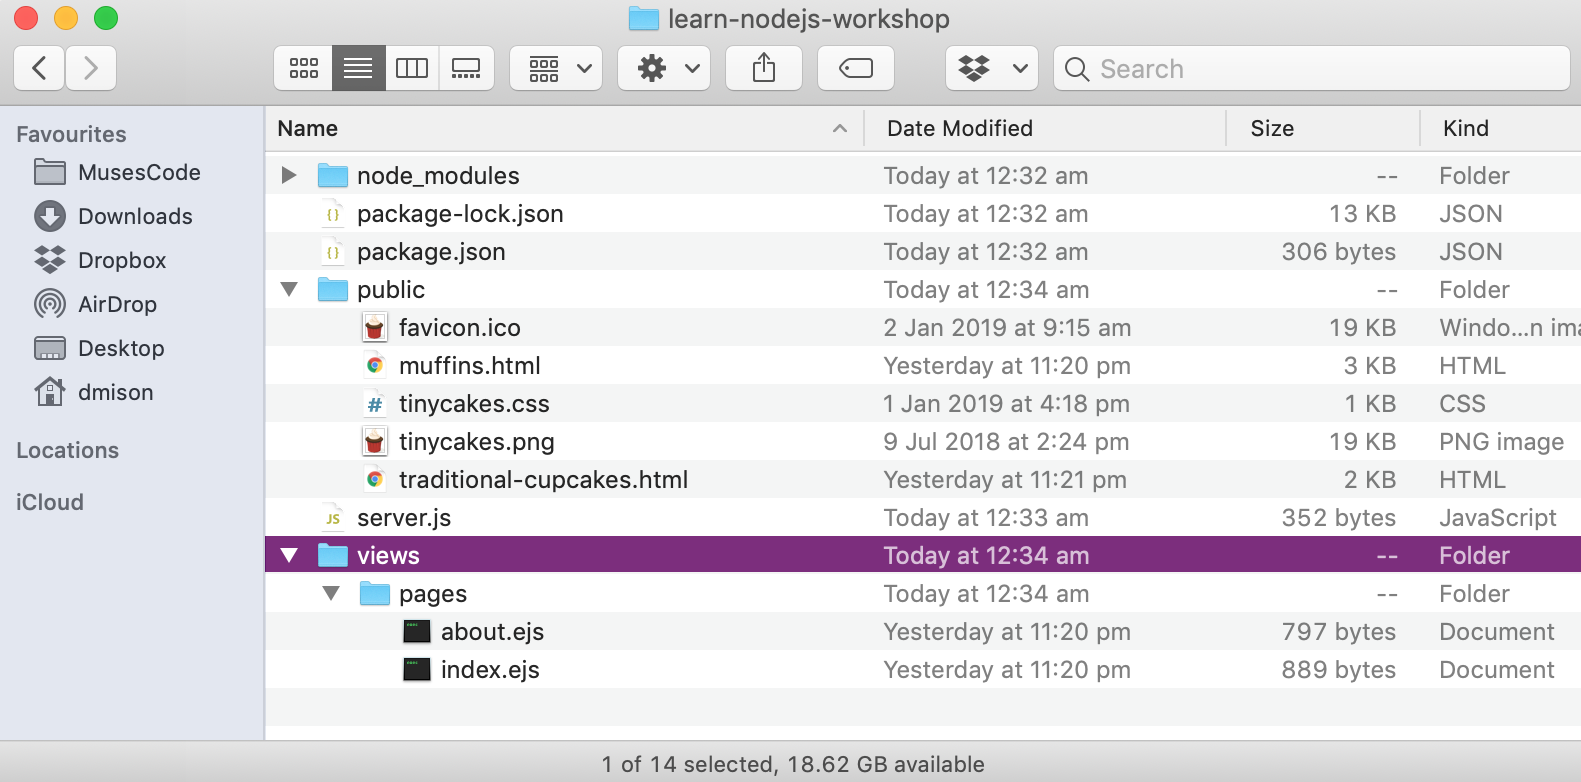
Express expects templates to be found in a folder called views. So lets create that folder, and another folder within that called pages. We are going to put our page templates in this folder.
Once you’ve done that move the files index.html and about.html from public to views/pages, and rename them to index.ejs and about.ejs.

Adding routes that use templates
Since we’ve moved index.html and about.html from our public folder to views/pages we have to add routes for them. Add the following routes:
server.get('/', function(request, response) {
  response.render('pages/index');
});


server.get('/about', function(request, response) {
  response.render('pages/about');
});
Notice how we added add routes for / & /about instead of /index.html and /about.html ? That’s a fairly common practice because it makes the URLs a little more clearer and simpler, and more related to the nature of the content rather than a specific file.
Notice that we used response.render() instead of response.send() this time? Render tells the view system to find the specified template, process it (render it) and send it to the client as the response. And we didn’t have to include .ejs for the template name either.
If you save this and restart the server and go to http://localhost:3000/ you should see your homepage as before:

You will notice that the link to About in the menu doesn’t work because it points to /about.html instead of /about.

We’ll fix that soon.
So now we are rendering those two pages as templates, but we aren’t really taking advantage of templates yet. In the next step we’ll start to see some cool stuff we can do with them.
 Muses Code