Part 0 - Getting Started
Part 1 - Basics
- 4 - Variables
- 5 - Operators
- 6 - Functions
- 7 - Conditional Statements
- 8 - Arrays
- 9 - Loops
- 10 - Exercise: FizzBuzz
- 11 - Congratulations
Part 2 - The Browser
Useful Links
Step 2 - Adding some JavaScript
Ok now that we understand a little about how to create a simple webpage, let’s add some JavaScript to it.
There are two different ways to add Javascript to a page. The first way is to put your Javascript inside a <script> tag.
Edit index.html and update the <head> element like this:
<head>
  <title>My awesome webpage</title>
  <script>
    console.log("OMG this is JavaScript");
  </script>
</head>
Save this, refresh your page and nothing should look different.
But if you open your Dev Tools and look at the Console, you will see the message OMG this is JavaScript.
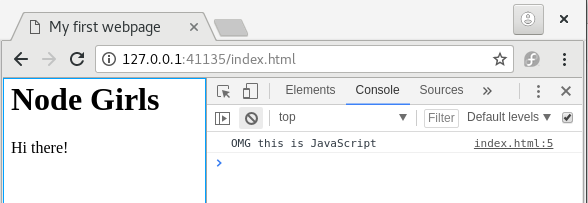
When your browser loads a page, it starts at the first tag and works through the whole document displaying it as it goes. When your browser encounters a <script> tag, it stops and runs that code before continuing to displaying the rest of the page.
So what does console.log() do exactly?
console.log()
console.log() tells the browser to display messages and other information in the Dev Tools console. We call these ‘console’ or ‘log’ messages, and they only appear in the Dev Tools Console. Anyone interacting with your webpage isn’t going to see them unless they open the Dev Tools Console.
console.log() is for you (the developer) to use when debugging. That is when you trying to figure out why something isn’t working as you expected it to. It’s also common to use it when you are learning a new thing. You can use console.log() to display error & status messages or anything else which you think might help you.
alert()
Enough with the Console for a bit, what about something a user could actually see.
Edit the page again and replace the console.log line with:
alert('Hello there!');
Save and refresh the page, and a small window will popup in your browser with the text ‘Hello there!’ in it.

External Javascript files.
We said earlier that there are two ways to bring JavaScript in using a <script> tag.
The other way is to use <script> to load JavaScript from another file into this page.
You do this by putting the Javascript in a different file, and then using the src attribute to specify that file as the script source.
Let’s update what we already have:
- Create a new file in the same folder, call it
myscript.js. - Copy the Javascript from inside your
<script>tags to that file and save it. Don’t copy the<script>tags themselves, just the code inside them. - Replace the previous
<script>tag with:<script src="myscript.js"></script> - Make sure both files are saved and refresh the page in your browser.
It will work exactly the same.
Separating JavaScript out into its own files like this is generally considered a good practice. It’s a bit nicer to work with, especially when the same piece of code is being included in a number of different pages.
COMMENTS
One more thing before we move on, comments.
Comments are a way to mark bits of your code or other text so that a browser will ignore them.
Why would we want to do this? Why have part of what we write get ignored by the computer?
As a developer you will quickly discover that you spend a lot of time reading other people’s code, either because you want to fix a bug or because you want to learn how they did something. Sometimes code is clear and simple, but a lot of the time it’s not obvious how it works unless you’re familiar with it.
Comments give developers a way to put explanations, advice, and reminders into their code so that other developers can understand it more easily. Sometimes files will have a big comment block at the top which outlines the purpose of the file, who wrote it, and a list of when and why changes were made.
Think of comments as being able to stick post-it notes in your code.
In JavaScript there are two sorts of comments: single-line & multi-line.
Single line comments start with // and continue to the end of the line.
// This is a single-line comment.
You can also put single-line comments on the end of lines too.
alert('Welcome to NodeGirls'); // this is a comment on the end of a line.
Multi-line comments start with /*, end with */ and can go across multiple lines.
/*
  Multi-line comments look like this.

  They make it easier to write larger blocks of prose for
  detailed explanations or other notes without marking each
  line with a comment.

  You only need to mark the beginning and the end.
*/
In case you are wondering, HTML also has comments, but it uses the same symbols regardless of comment length. HTML comments start with <!-- and end with -->.
Feel free to try those out too if you’re curious.
Then head onto the next step.