Workshop Steps
- 0 - Environment Setup
- 1 - Setting up your project
- 2 - Installing Express
- 3 - Building the server
- 4 - Talking to the server
- 5 - Serving static files
- 6 - Displaying your posts
- 7 - Saving New Posts (1/4)
- 8 - Saving New Posts (2/4)
- 9 - Saving New Posts (3/4)
- 10 - Saving New Posts (4/4)
- 11 - Congratulations
Challenges
Useful Links
Step 0 - Environment Setup
Ok before you get started coding you need to setup all the things that you are going to need.
To create software using Node.js you need three things:
- The Node.js runtime
- An editor
- A command-line terminal (to run commands in)
You can download and setup these things on your own computer but it can be tricky and time consuming.
To save time, we recommend using Cloud9, an online service that provides all of those things pre-configured as a web application.
We’ll step you through the entire process below.
For those who want to take the leap of setting up your own machine, the steps are here.
GitHub
Before we set up Cloud9, let’s create a GitHub.com account.
GitHub.com is a web site that makes it really easy for multiple people to share and work on the same projects together using a program called Git. Git provides you with a way of tracking all the changes that you make to your project. Git is a pretty big topic that we aren’t going to go into here, so don’t worry too much about understanding it right now.
The workshop files are hosted in GitHub. We’ll create a GitHub account and “fork” the NodeGirls express-workshop-2 repository. This means you will get a copy of all the workshop files in your GitHub account. Repository is just another name for a collection of files and folders being managed by Git. Then when you setup your Cloud9 workspace you can point it at this repository to access the files.
By the way, Git is very popular and widely used both in companies and open-source projects, so we highly recommend that you spend some time learning about it after the workshop.
Create a GitHub Account
- Go to GitHub.com and follow the prompts to create an account there.
Fork the Repository
- Go to https://github.com/node-girls-australia/express-workshop-2.
- Click the
Forkbutton on the top right.
This will take a moment, and then you will be redirected to your new copy of the repository.
You now have your own copy of the workshop files in GitHub.
Cloud9
Cloud9 is a web site that provides an online development for several languages including Node.js. You can access it using just a web browser which makes it really easy to get started.
Create a Cloud9 account
- Ask a mentor to send you an invite to the Node Girls Cloud9 team. This only takes a few minutes.
- When you receive the invitation email, click on the link and follow the prompts to set up an account.
Connect Cloud9 to GitHub
Once you are logged into your Cloud9 account, you can connect it to your GitHub account so you can use Cloud9 to access your copy of the workshop.
- Click repositories.
- Click Connect on GitHub item, and follow the prompts to authenticate Github.
Now the Repositories page should show a list of your GitHub repositories including your express-workshop-2 repository.
Creating a Cloud9 Workspace
Workspaces are how Cloud9 organises projects. Think of each workspace as the UI for interacting with your project, editing the files, running commands, etc.
We will create a new workspace which will let you work on the files from your express-workshop-2 git repository.
- Go to your Repositories page in cloud9 and find the entry for
express-workshop-2 - Click on the Clone to edit button
- On the
Create a new workspacepage:- Enter a name for the workspace
- Select the Node.js template
- Click Create Workspace
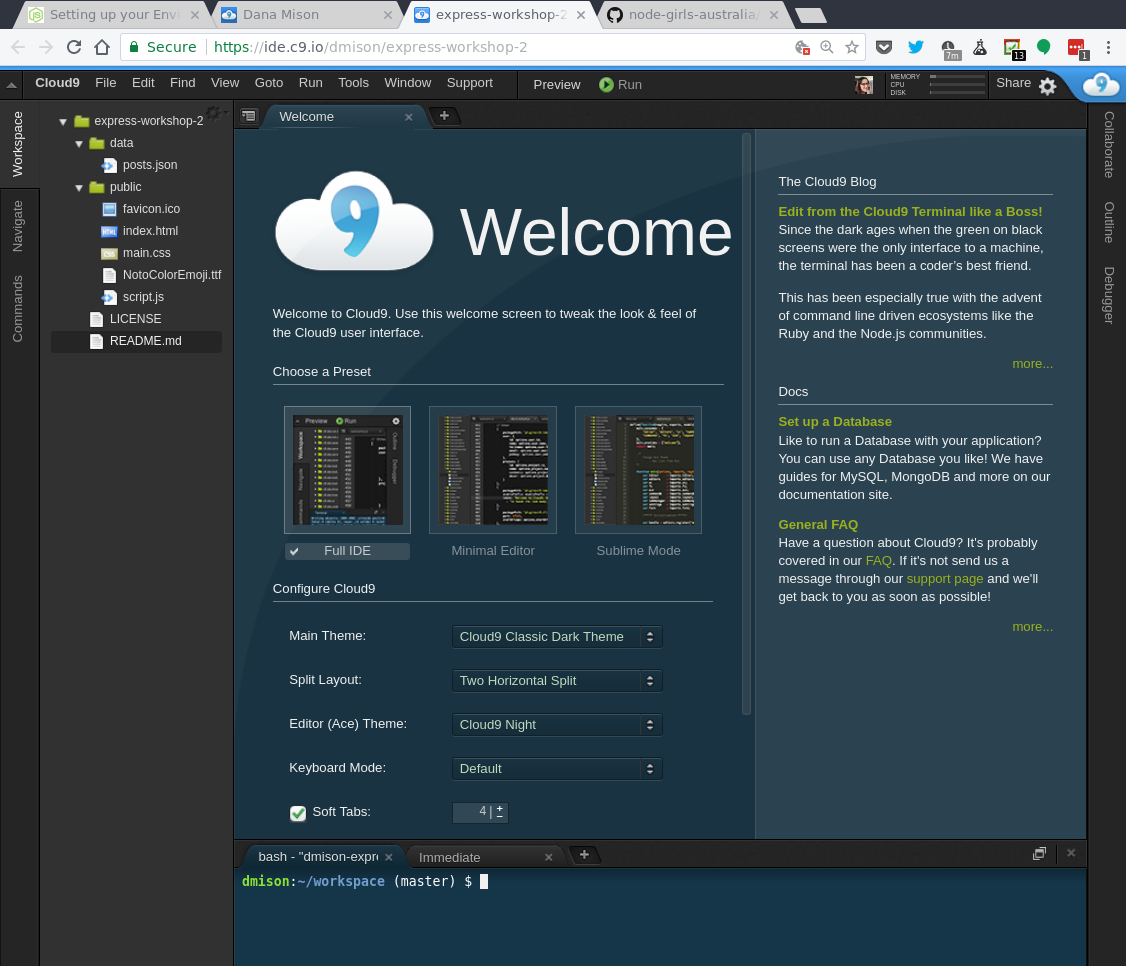
Cloud9 sets up the workspace and opens it for you with the “Welcome Page” open.

The three main areas you need to know about are:
- The workspace file view on the left where you can see all the files in your project. Double-clicking on a file will open it in the editor view.
- The editor view takes up the main space in the middle. It is where you edit your source code. Each file opens in a new tab here.
- The terminal tab at the bottom. This is the command line space where you will run various commands during the workshop such as installing packages and running your code.
You can rearrange this space as you see fit, and also add and remove items from it. If you need to get back to the original layout, you can do this by going to the main menu and selecting Window -> Presets -> Full IDE.
| Keyword | Explanation |
|---|---|
| Cloud9 | Web-based development environment. See https://c9.io |
| Editor | program to edit text files |
| Fork | A fork is a copy of a repository. Forking a repository allows you to freely experiment with changes without affecting the original project. Read more here |
| Integrated Development Environment (IDE) | software suite containing editor, terminal, and other tools |
| Terminal | shell to run commands |