Workshop Steps
- 0 - Environment Setup
- 1 - Setting up your project
- 2 - Installing Express
- 3 - Building the server
- 4 - Talking to the server
- 5 - Serving static files
- 6 - Displaying your posts
- 7 - Saving New Posts (1/4)
- 8 - Saving New Posts (2/4)
- 9 - Saving New Posts (3/4)
- 10 - Saving New Posts (4/4)
- 11 - Congratulations
Challenges
Useful Links
Challenge 1 - Mood Indicator
This challenge adds a menu to to pick a “mood” (happy,sad, angry etc) from a list when making a post. That mood is then displayed on that post.
Here's how a challenge works:
- We tell you how to change the front-end for the new feature.
- We describe the expectations for the backend changes.
- We'll discuss the steps & things you need to understand to do this and give some hints.
- Then you have to implement the backend changes yourself.
There will be a solution at the end. But remember there is always more than one way of doing things. ![]()
1. Enabling the UI
First up we have some changes to the UI.
To add these changes do the following steps:
-
Open up
public/main.cssFind the line
/* 1. mood indicator */.Insert the following code after that line:
@font-face { font-family: 'NotoColorEmoji'; src: url('NotoColorEmoji.ttf'); text-decoration: none; font-style: normal; } div.mood { margin: 5px; font-size: 18px; } div.mood .emoji { font-family: 'NotoColorEmoji'; font-size: 30px; } div.mood-select { margin: 25px 15px; font-size: 20px; display: inline-block; } @media screen and (max-width: 600px) { div.mood-select { margin: 15px 20px 0px 20px; } } -
Open up
public/script.jsFind the line
// 2. insert mood display here.Insert the following code after that line:
var moodNames = [ '', '<span class="emoji">😃</span> Happy', '<span class="emoji">😛</span> Joking', '<span class="emoji">😢</span> Sad', '<span class="emoji">😔</span> Regretful', '<span class="emoji">😡</span> Angry', '<span class="emoji">😲</span> Suprised', '<span class="emoji">😎</span> Smug', '<span class="emoji">👑</span> Triumphant', '<span class="emoji">😍</span> In love' ]; var moodDiv = document.createElement('div'); moodDiv.className = 'mood'; moodDiv.innerHTML = moodNames[post.mood]; postText.append(moodDiv); -
Open up
public/index.htmlFind the line
<!-- 3. mood selector -->.Insert the following code after that line:
 <div class="mood-select">I'm feeling:
   <select name="mood">
     <option value="0">None</option>
     <option value="1">😃 Happy</option>
     <option value="2">😛 Joking</option>
     <option value="3">😢 Sad</option>
     <option value="4">😔 Regretful</option>
     <option value="5">😡 Angry</option>
     <option value="6">😲 Suprised</option>
     <option value="7">😎 Smug</option>
     <option value="8">👑 Triumphant</option>
     <option value="9">😍 In love</option>
   </select>
 </div>
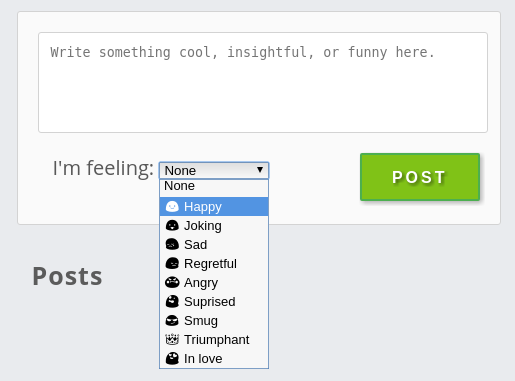
Make sure you save those changes and refresh the web page. You should see the “Mood” menu near the POST button.
It will look like this:

With the above changes, the webpage now does the following:
- When creating a new post, it sends a value of 0 to 9 as the field
moodas part of the form data. - Expects the blogpost objects retrieved from
/get-poststo each have a mood property, with a value of 0 to 9, for which it displays the corresponding mood emoji and description.
Once properly implemented posts with a mood set will look like this:

Backend Specification
The following changes are required:
-
/create-postreceives an additional form data field,moodwhich must be saved as part of the post object. -
The post objects returned by
/get-postsshould include a mood property. Example:{ "timestamp": "2342423432233", "content": "This is a new post", "mood": "3" }
Hints
- Remember you can use
console.log()to check how the contents of variables or parameters change. - You will only need to change the
/create-postendpoint to ensure that the mood data is saved. -
/get-postsreturns all the information regardless so no changes are required there.
Solution
If you get stuck or just want to compare with your answer click below to see our solution.
Note that this solution only shows the endpoint in question, not all of server.js.
app.post('/create-post', function (request, response) {
  var now = Date.now();
  var newPost = {
    timestamp: now,
    content: request.fields.blogpost,
    mood: request.fields.mood
  }

  fs.readFile(__dirname+'/data/posts.json', function (error, data) {
    if(error){
      console.log('Error reading posts.json: ' + error);
      response.status(500);
      response.send(error);
    } else {
      var posts = JSON.parse(data);
      posts.blogposts.push(newPost);

      var updatedData = JSON.stringify(posts);

      console.log(posts);
      console.log(updatedData);

      fs.writeFile(__dirname+'/data/posts.json', updatedData, function (error) {
        if (error) {
          console.log('Error writing posts.json: '+error);
          response.status(500);
          response.send(error);
        } else {
          response.send(newPost);
        }
      });
    }
  });
});
Remember just because your solution doesn’t look exactly like this one doesn’t mean that it is wrong. The important question is whether it works or not. If your answer is very different you might want to ask a mentor in case you are doing something that looks like it works but will create problems for you later.